Refer to the welcome email for information on how to log in to your cPanel and start using it. You may use any of the following to access your cPanel, the first three are the most preferable:
http://yourdomain.tld/cpanel
https://serverhostname:2083
http://serverhostname:2082
http://cpanel.yourdomain.tld
http://yourdomain.tld:2082
http://serverIP:2082
Remember; yourdomain.tld is to be substituted with your actual domain name. If you choose the link with “serverhostname” or “serverIP”, use the corresponding value indicated in your hosting welcome email.
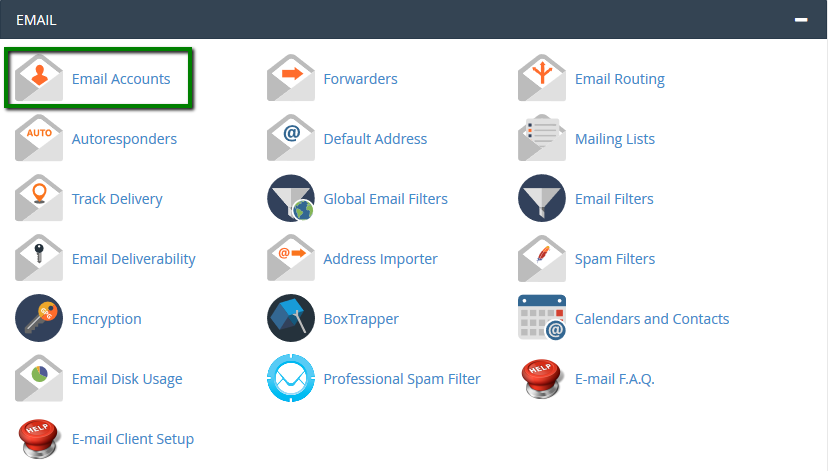
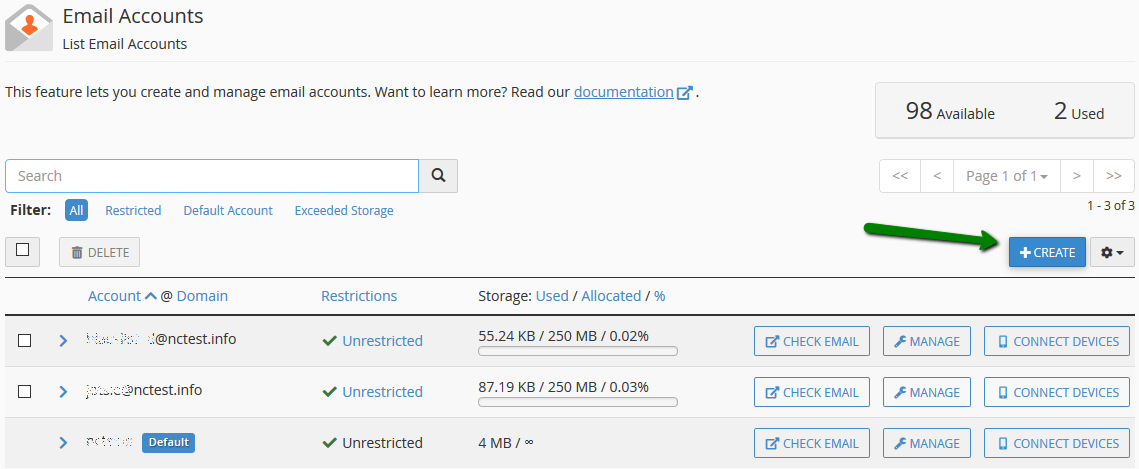
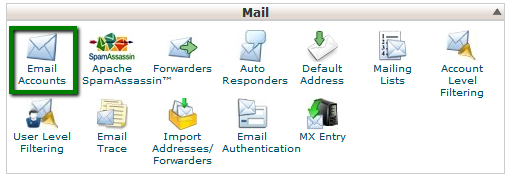
1. Log in to your cPanel >> Mail section >> Email Accounts menu. The Email Accounts menu can be accessed quickly via cPanel Shortcuts in the Namecheap account.
2. Navigate to the +Create button:
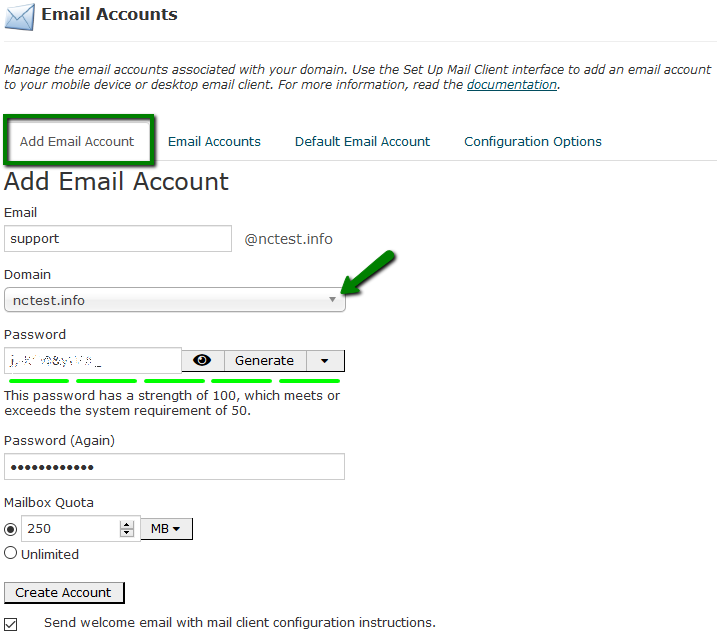
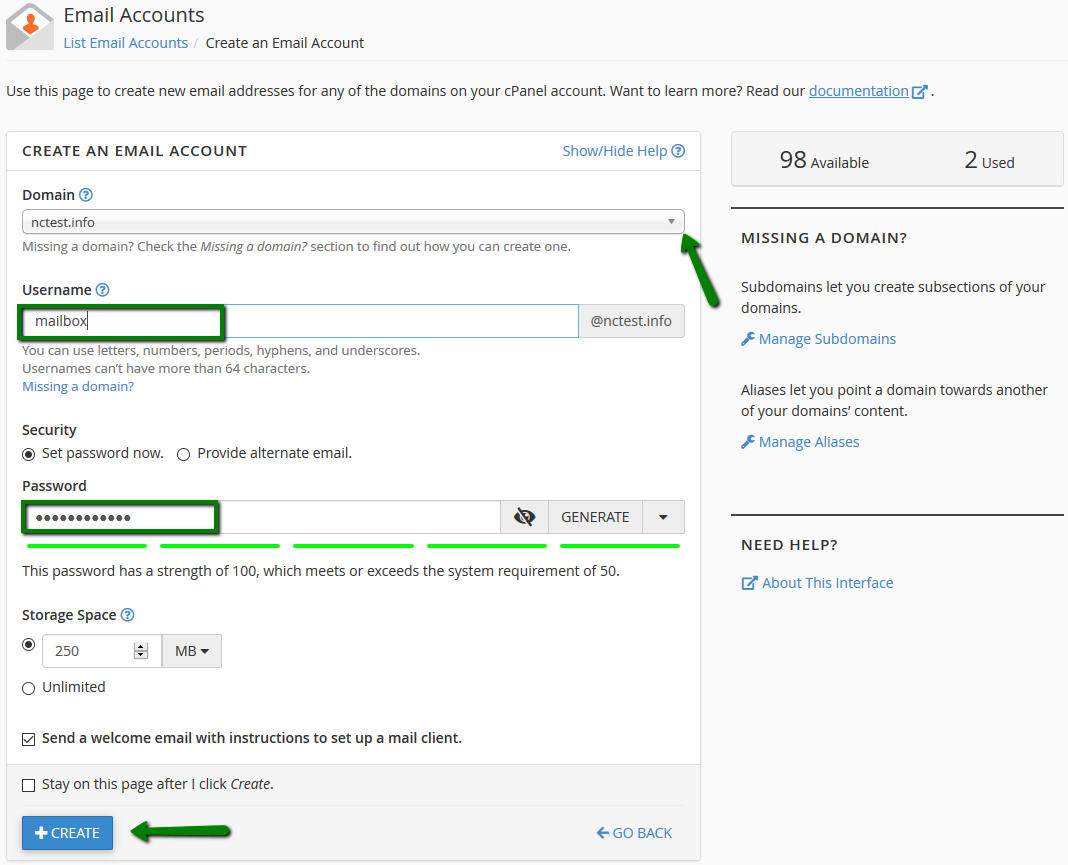
3. If you have multiple domains, select the domain you want your email account to be associated with in the drop-down list in the top right corner and enter the desired email. It is possible either to set the password right away: or provide an alternate email (the system will send an email with a password configuration link).
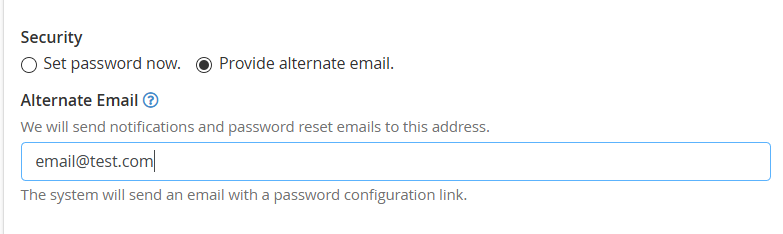
Or provide an alternate email (the system will send an email with a password configuration link as well as notifications and password reset emails):
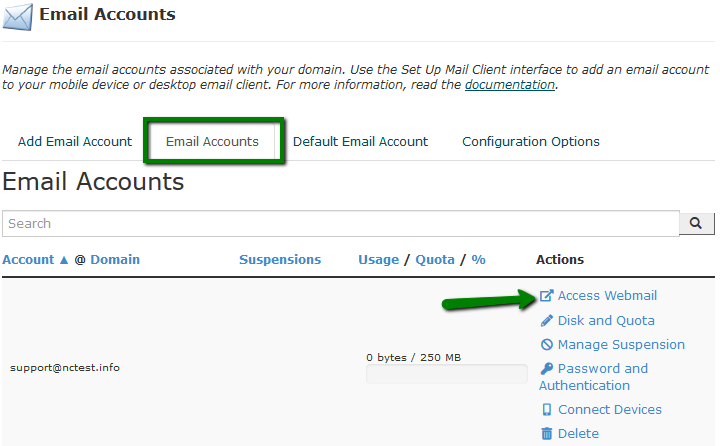
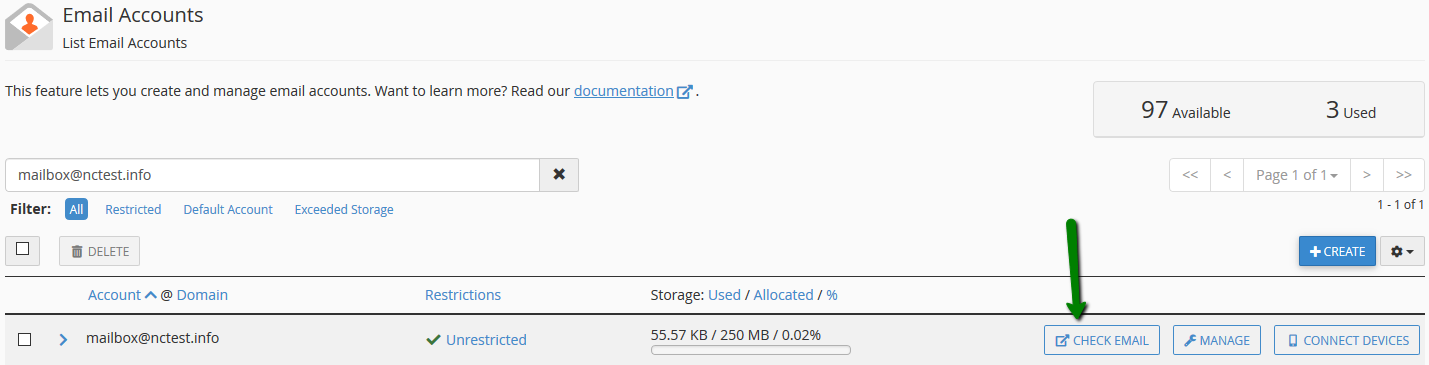
Click on +Createonce all is set. 4. To log in to webmail, click on Check Email next to the email account in question:
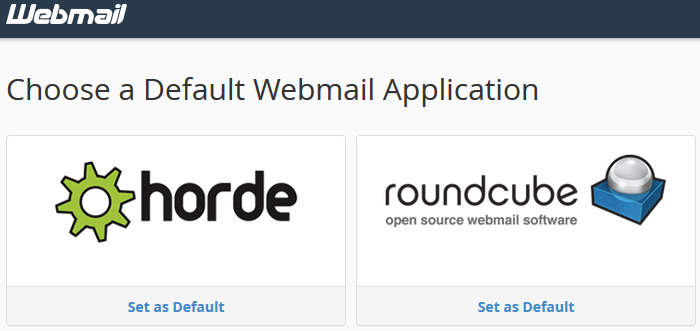
5. Once done, you will see the icons of the available webmail interfaces:
6. Feel free to choose any access webmail.
Horde webmail interface:
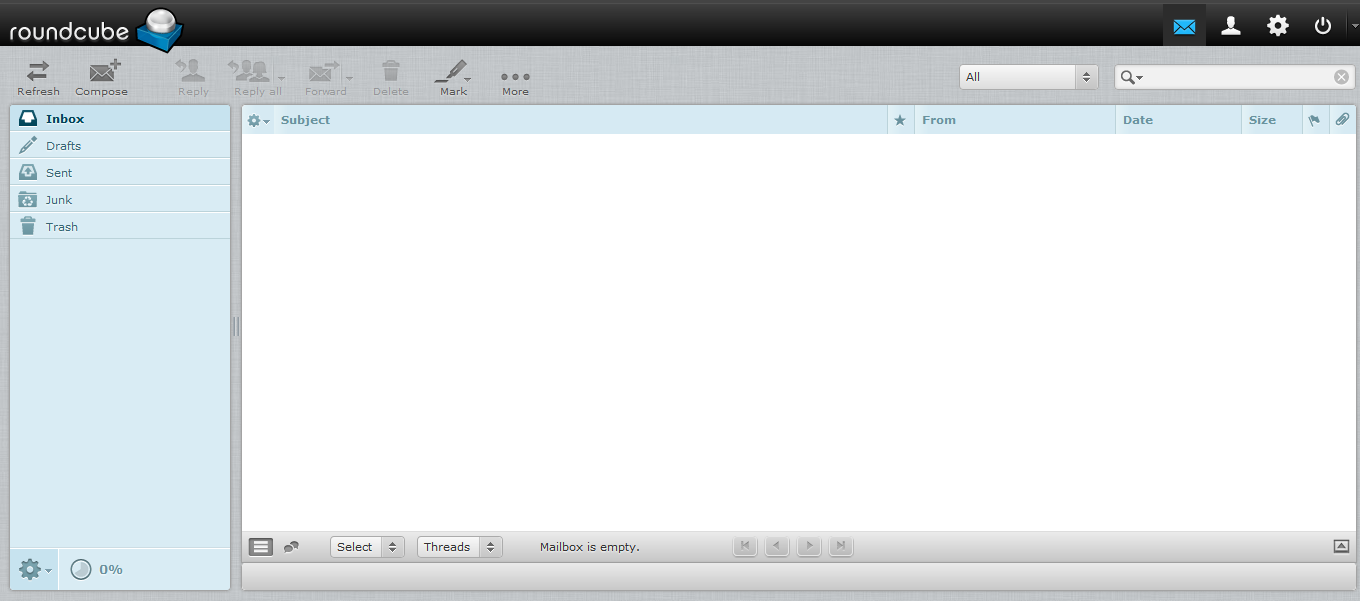
Round cube webmail interface:
You can also access cPanel webmail directly in the browser using one of the following links: https://yourdomain.com/webmailhttp://webmail.yourdomain.com
NOTE: If you use http://webmail.yourdomain.comlink to get into your cPanel webmail, you will most likely see a ‘broken’ interface when accessing the Horde webmail client. It happens since such proxy link uses port 80 to connect, while the default cPanel configuration for the aforementioned clients implies port 81. This mismatch may result in a connection error or corrupted webmail displaying.
How to create an email account in cPanel Retro Theme:
1. Log in to your cPanel >> Mail section >> Email Accounts menu. The Email Accounts menu can be accessed quickly via cPanel Shortcuts.
2. Navigate to the +Create button: 3. If you have multiple domains, select the domain you want your email account to be associated with within the drop-down list in the top right corner and enter the desired email. It is possible either to set the password right away or provide an alternate email (the system will send an email with a password configuration link).
Click on +Createonce all is set. 4. To log in to webmail, click on Check Email next to the email account in question:
5. Once done, you will see the icons of the available webmail interfaces:
6. Feel free to choose any access webmail.
Horde webmail interface:
Round cube webmail interface:
You can also access cPanel webmail directly in the browser using one of the following links:
https://yourdomain.com/webmail
http://webmail.yourdomain.com
Remember; If you use the http://webmail.yourdomain.com link to get into your cPanel webmail, you will most likely see a ‘broken’ interface when accessing the Horde webmail client. It happens since such proxy link uses port 80 to connect, while the default cPanel configuration for the aforementioned clients implies port 81. This mismatch may result in a connection error or corrupted webmail displaying
The article describes how to set forwarding for the cPanel email service.
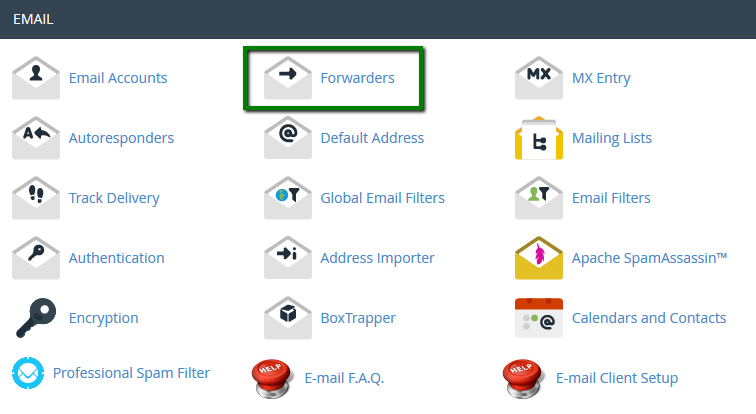
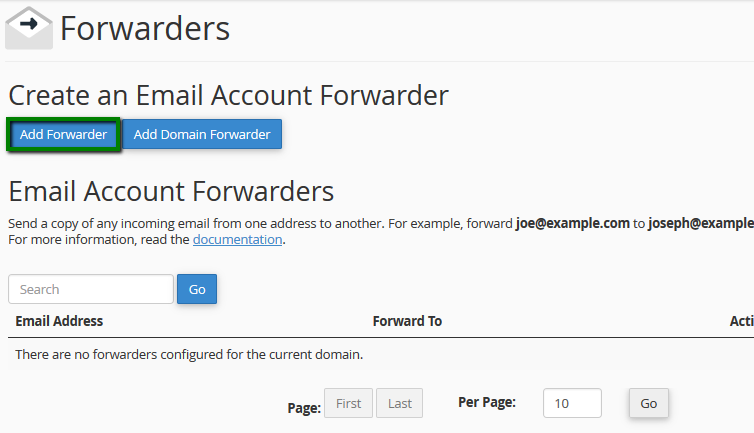
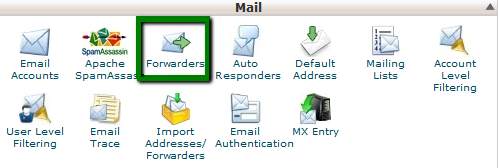
for cPanel paper_lantern theme: 1. Log into your cPanel, navigate to Email section > Forwarders:
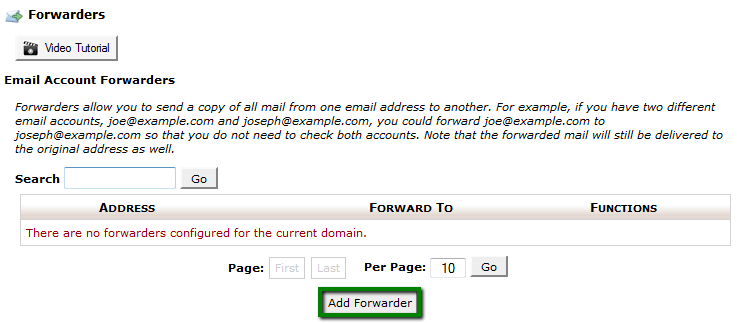
2. To create a new forwarding rule, click on Add Forwarder:
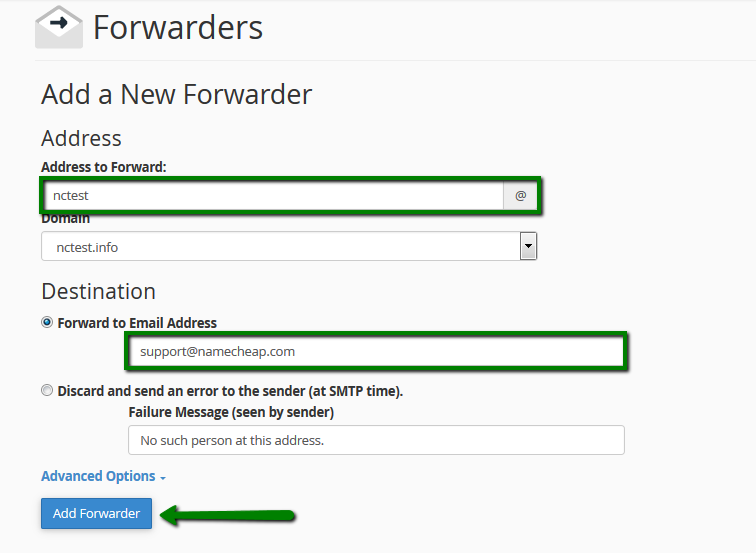
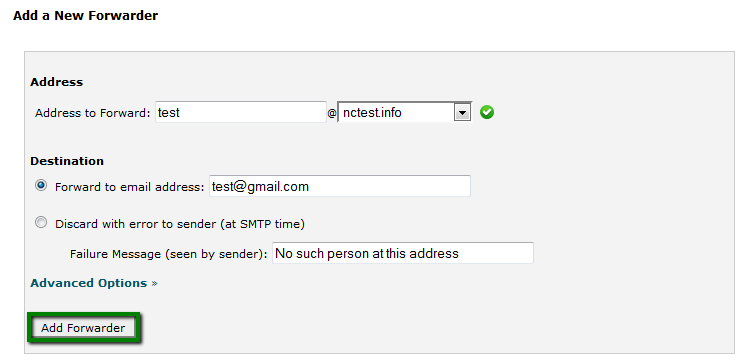
3. Fill out the fields and when ready click on Add Forwarder:
Remember; You can forward emails sent to a non-existent mailbox without having to create the mailbox itself.
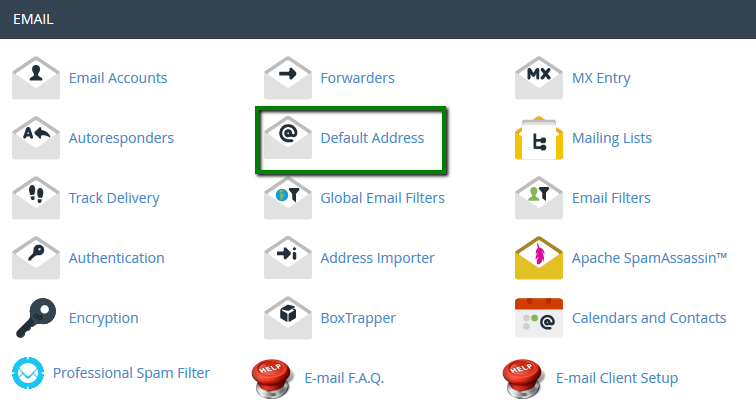
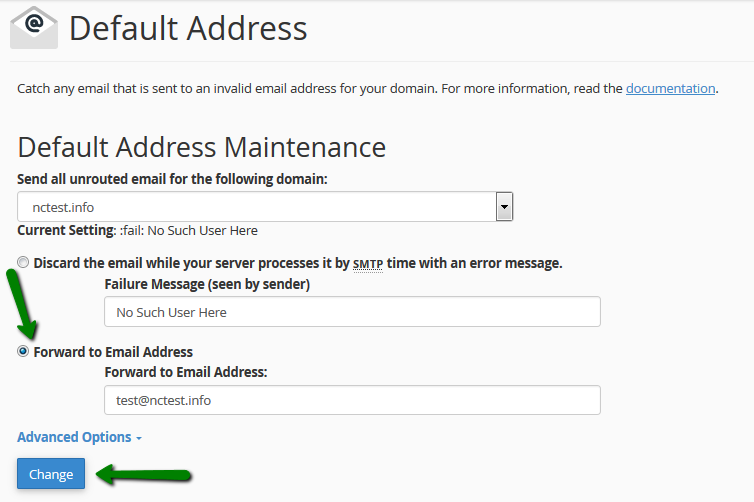
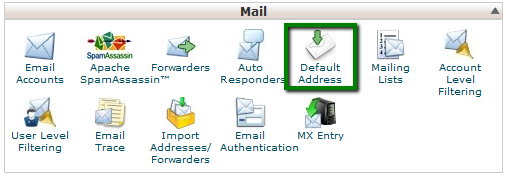
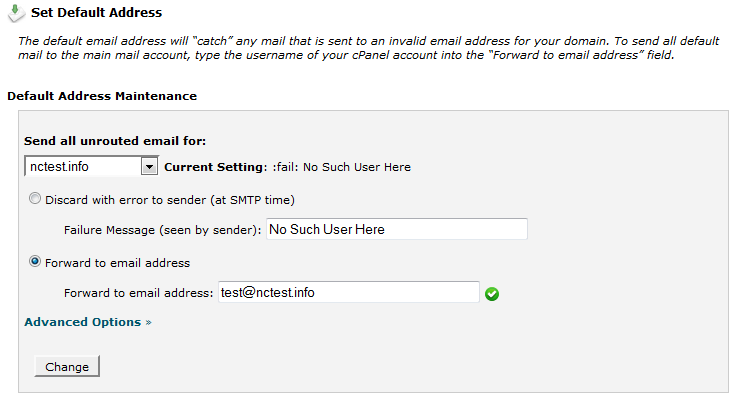
If you would like to set up a catch-all, you can use the Default Address menu:
The default email address will ‘catch’ any mail that is sent to an invalid email address for your domain.
So if you would like all email sent to @yourdomain.com to be forwarded to the existing mailbox [email protected], the forwarder should look as follows:
for cPanel x3 theme:
1. Log into your cPanel, navigate to section Mail > Forwarders:
2. To create a new forwarding rule, click on Add Forwarder:
3. Fill out the fields and when ready click on Add Forwarder:
Remember; You can forward emails sent to a non-existent mailbox without having to create the mailbox itself.
If you would like to set up a catch-all, you can use the Default Address menu:
The default email address will ‘catch’ any mail that is sent to an invalid email address for your domain.
So if you would like all email sent to @yourdomain.com to be forwarded to the existing mailbox [email protected], the forwarder should look as follows:
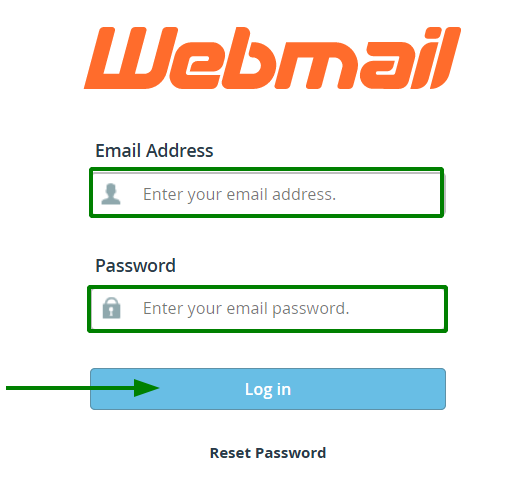
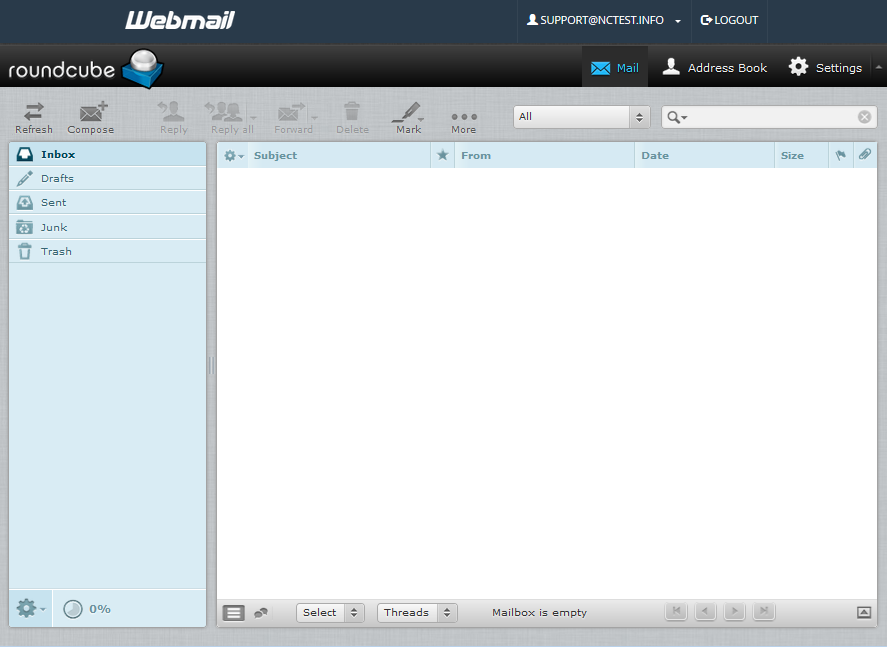
Once Webmail has loaded, enter the email address and the password of the account you want to access and click the Login button:
Remember; If you use the http://webmail.yourdomain.com link to access your cPanel webmail, there’s a good chance you’ll see a ‘broken’ interface when you come accessing the Horde webmail client. It happens since such a proxy link uses port 80 to connect, while the default cPanel configuration for the aforementioned clients implies port 81. This mismatch may result in a connection error or corrupted webmail displaying.
cPanel is an online hosting control panel with a kit of useful tools and a user-friendly graphic interface. It is designed to simplify the website content, emails, and server management. When you purchase a shared hosting plan you get a cPanel free of charge.
How to Transfer
We will perform the transfer of your cPanel hosting account as it is to our servers. The current account you have should not exceed the limits set by your new Reachnetsystems hosting plan. Our migration team will need to check the number of hosted domains, email accounts, and MySQL databases.
We will analyze the resource usage, compatibility with our services, and PHP/CMS versions. Your current hosting provider should also have a technical possibility to generate the full cPanel backup. This will ensure your account is migrated just the way it was designed to be.
Just submit a ticket to our support team providing the necessary details and we will check if all the requirements are met. This is a standard procedure for the hosting transfers team to check the previous account in order to confirm it can be transferred and to handle the migration process.
We will specify the additional details if needed, generate the backup, upload it to our servers and then restore it to the new account you have with Reachnetsystems. Please note that the current data will be overwritten with the backup from the previous host.
Basically, you will have the same account with all data and settings intact but on a faster, more reliable Reachnetsystems server.
In order to transfer your hosting account from another hosting provider to Reachnetsystems, you will need to perform two important steps:
To transfer your files/databases to your Reachnetsystem hosting account you have to point your domain name to our hosting servers.
Then back up and migrate the files.
Backing up and migrating files
If your current hosting account does not have cPanel, you will need to create backups for every part of your account (databases, website files, emails, etc.) using the tools available in your current hosting account’s control panel:
Back up and download the content of your website(s) to your PC
Back up and download all your website-related databases. If the phpMyAdmin is installed then follow the steps here.
Upload the saved content of that old account to the root directory for the domain name in your Reachnetsystems hosting account (/home/user/public_html – folder for the main domain name; /home/user/public_html/addondomain.tld – for the addon domain name)
If you wish to use FTP to upload, you can connect to the hosting server’s IP address and log in with your new cPanel username and password provided by Reachnetsystems or the ones you created.
You can also use cPanel and go to the file manager tool if you have a backup of your content.
Log in to cPanel and locate File Manager
Then restore it, using the Extract tool located in File Manager
If you only have files without connected databases (e.g. an HTML website), you are officially finished with the process.
How to Restore MySQL Databases
However, if you have a database already associated with your website, you will need to import it to Reachnetsystems. To do this, please follow the following steps:
Create a new database and a database user in your Reachnetsystems cPanel, then assign the user to that database.
Now you will need to import the database dump (.sql backup file downloaded from the previous server) via the phpMyAdmin tool. Follow these steps using cPanel>then navigate to phpMyAdmin>select database to import then>click on import.
To export the database follow these steps: cPanel>phpMyAdmin>select the database that you will import to>choose the tables that you need to export or check all>export.
Select the required file (drop-down menu) information click Go.
Once you have completed the previous steps, you will need to enter the new database connection credentials in the configuration files of your website (e.g. for a WordPress website this is wp-config.php file; for Joomla – configuration.php; for Drupal – settings.php). Please use the proper database name and username as they have their prefixes changed. In order to make sure you are using the correct ones, please navigate to cPanel > MySQL Databases:
To connect your domain name with your website on the new server, you must point this domain name to Reachnetsystems hosting DNS.
On the top right corner under your name, scroll down to your profile.
Here you can change your email address.
After you change your email address click on save changes. That is it!
We use cookies on our website to give you the most relevant experience by remembering your preferences and repeat visits. By clicking “Accept”, you consent to the use of ALL the cookies.
This website uses cookies to improve your experience while you navigate through the website. Out of these, the cookies that are categorized as necessary are stored on your browser as they are essential for the working of basic functionalities of the website. We also use third-party cookies that help us analyze and understand how you use this website. These cookies will be stored in your browser only with your consent. You also have the option to opt-out of these cookies. But opting out of some of these cookies may affect your browsing experience.
Necessary cookies are absolutely essential for the website to function properly. This category only includes cookies that ensures basic functionalities and security features of the website. These cookies do not store any personal information.
Any cookies that may not be particularly necessary for the website to function and is used specifically to collect user personal data via analytics, ads, other embedded contents are termed as non-necessary cookies. It is mandatory to procure user consent prior to running these cookies on your website.

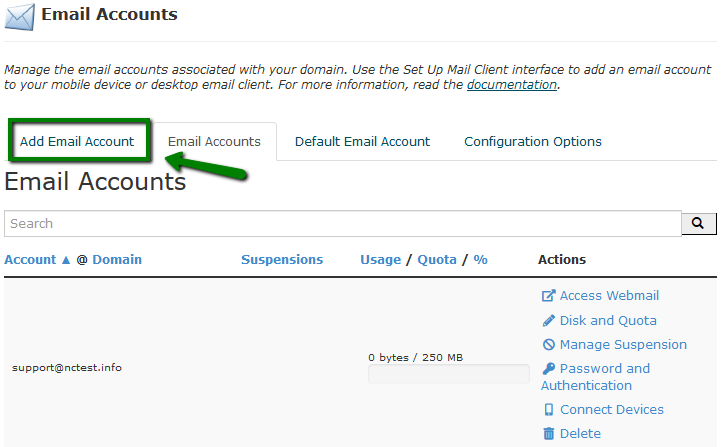 3. If you have multiple domains, select the domain you want your email account to be associated with within the drop-down list in the top right corner and enter the desired email. It is possible either to set the password right away or provide an alternate email (the system will send an email with a password configuration link).